AO-7 Adaptive Optics
 Autoguiding an LX200 or RCX400
can produce good results (round
sharp stars) at lower focal lengths (e.g. 1000mm or below). However,
the accuracy of the mount on these telescopes even after PEC training does
not yield very good results a the full focal length of the scope (2000mm
or above). This is because the mount position can only be corrected
every few seconds at best and any error in the tracking of the mount
during the correction periods shows up in the images taken at longer focal
lengths as large of elongated stars. It is not just the stars that
are affected though. The fine detail in the object being imaged is
also lost as it is smeared out over the CCD chip during the
exposure. A very good solution to this problem is to use the AO-7
adaptive optics system from SBIG. This unit attaches between the CCD
camera and the telescope. It has a mirror which reflects the light
from the telescope onto the CCD chip. Very short exposures of a
guide star (up to 40 images per second) are taken using the guide chip in
the CCD camera and the AO-7 tilts its mirror between each exposure to
compensate for any movement caused by poor tracking or atmospheric
disturbance. If the guide star drifts too far over time for the
mirror tilt to compensate, then the AO-7 sends pulses to the mount to
adjust the guide star position back towards the centre of the
mirror. The frequent and very accurate correction of the tracking
that is possible with the AO-7 mirror means that inaccuracies in the
tracking of mount are corrected as well as some effects atmospheric
disturbance. You can see the difference between guiding with the
AO-7 and the RCX400 in these images of M1.
In 2008 I replaced with AO-7 system with the new AO-8. This has
the advantage of straight through optical design. This leads to a
shorter backfocus enabling me to use the adaptive optics on the FS-60C
which has a much shorter backfocus than the RCX400. The straight
through design also allows the the camera to be mounted in line with the
optical axis of the telescope instead of at right angles. Autoguiding an LX200 or RCX400
can produce good results (round
sharp stars) at lower focal lengths (e.g. 1000mm or below). However,
the accuracy of the mount on these telescopes even after PEC training does
not yield very good results a the full focal length of the scope (2000mm
or above). This is because the mount position can only be corrected
every few seconds at best and any error in the tracking of the mount
during the correction periods shows up in the images taken at longer focal
lengths as large of elongated stars. It is not just the stars that
are affected though. The fine detail in the object being imaged is
also lost as it is smeared out over the CCD chip during the
exposure. A very good solution to this problem is to use the AO-7
adaptive optics system from SBIG. This unit attaches between the CCD
camera and the telescope. It has a mirror which reflects the light
from the telescope onto the CCD chip. Very short exposures of a
guide star (up to 40 images per second) are taken using the guide chip in
the CCD camera and the AO-7 tilts its mirror between each exposure to
compensate for any movement caused by poor tracking or atmospheric
disturbance. If the guide star drifts too far over time for the
mirror tilt to compensate, then the AO-7 sends pulses to the mount to
adjust the guide star position back towards the centre of the
mirror. The frequent and very accurate correction of the tracking
that is possible with the AO-7 mirror means that inaccuracies in the
tracking of mount are corrected as well as some effects atmospheric
disturbance. You can see the difference between guiding with the
AO-7 and the RCX400 in these images of M1.
In 2008 I replaced with AO-7 system with the new AO-8. This has
the advantage of straight through optical design. This leads to a
shorter backfocus enabling me to use the adaptive optics on the FS-60C
which has a much shorter backfocus than the RCX400. The straight
through design also allows the the camera to be mounted in line with the
optical axis of the telescope instead of at right angles.
 An off-axis guider
(OAG) contains
a small prism which diverts some of the light around the edge of the telescope's field of
view (FOV) through 90 degrees and into an eyepiece. The prism is small enough that
it will not interfere with the FOV of a camera attached behind the OAG. This allows the
observer to see a small part of the sky just outside the FOV that is being
photographed. This is useful for tracking the motion of the telescope when taking an
image and making small corrections so that telescope drive or polar alignment errors do
not lead to pictures with star trails. An off-axis guider
(OAG) contains
a small prism which diverts some of the light around the edge of the telescope's field of
view (FOV) through 90 degrees and into an eyepiece. The prism is small enough that
it will not interfere with the FOV of a camera attached behind the OAG. This allows the
observer to see a small part of the sky just outside the FOV that is being
photographed. This is useful for tracking the motion of the telescope when taking an
image and making small corrections so that telescope drive or polar alignment errors do
not lead to pictures with star trails.
The technique for using the OAG for astrophotography is as follows. The best
eyepiece for use with an OAG is one that has illuminated cross hairs (the reason for this
will become clear). This type of eyepiece is often referred to as a reticle
eyepiece. Having centered the object to be photographed in the FOV of the camera, the
observer looks through the reticle eyepiece and hopefully sees a star. Assuming a
star is there, then for the duration of the photograph the technique is to make
adjustments to the telescopes RA and DEC drive so that the star always remains in the same
position relative to the reticle's cross hairs. This will ensure that the object
being photographed always stays in the same position in the camera FOV. Two things
immediately leap out at you from this technique. One is, what do I do if I can't see
the star? The second is, wouldn't it be nice if I could move the image of the star
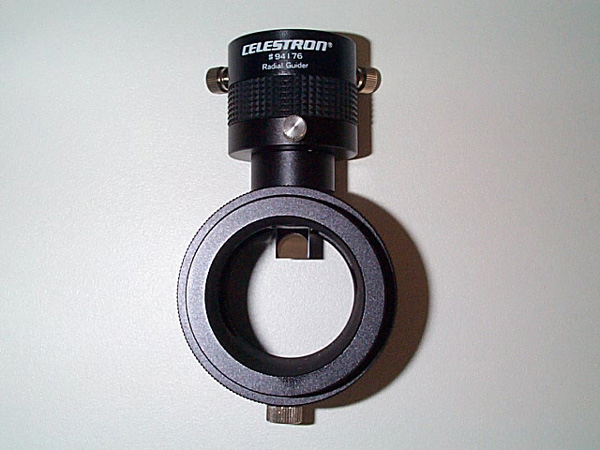
into the centre of the cross hairs in the reticle eyepiece. The Celestron Radial Off-axis
Guider has solutions for both of these.
The Celestron OAG allows you to rotate the reticle eyepiece approximately 145 degrees
around the outside of the telescope's field of view without changing the position of the
camera or the focus of the telescope. This allows a much better chance of finding a
guide star without having to rotate the complete OAG camera assembly.
The angle of the Celestron OAG prism is adjustable which enables you to move the image
of the guide star in the reticle eyepiece FOV. Combine this with the ability to
rotate the reticle eyepiece in the eyepiece holder and any star can quickly be centred in
the cross hairs.
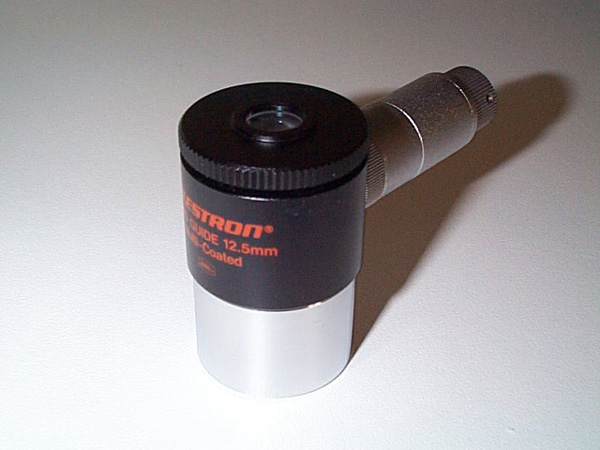
 The Celestron
Illuminated Microguide Reticle Eyepiece is ideal for use with the Celestron Radial
Off-axis guider. It has four separate scales etched on the reticle which allows its
use for guiding, measuring the angular position of double stars, determining the periodic
error of your telescope's drive or measuring the position angle of a comet's tail. The Celestron
Illuminated Microguide Reticle Eyepiece is ideal for use with the Celestron Radial
Off-axis guider. It has four separate scales etched on the reticle which allows its
use for guiding, measuring the angular position of double stars, determining the periodic
error of your telescope's drive or measuring the position angle of a comet's tail.
The illumination is provided by a battery powered red LED. The illumination power
is adjustable, but even on the lowest setting it can drown out some faint guide stars that
are visible with the LED switched off. It is possible to overcome this problem by
painting the LED with several coats of red nail varnish. This reduces the
illumination to an acceptable level.
I have found this to be a very useful and accurate piece of equipment.
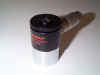
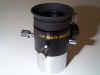 The Meade 9mm Illuminated Reticle Eyepiece is ideal for use with the
Celestron Radial Off-Axis Guider. Unlike the Celestron reticle eyepiece which can be
be used to measure angular positions and distances as well as guide, the Meade reticle
eyepiece is designed only for guiding. It has cross hairs and a bullseye etched on
the reticle. However, unlike the Celestron eyepiece there are two screws on the
Meade eyepiece that allow you to adjust the position of the bulls eye in the
FOV.
When combined with capability of adjusting the prism on the Celestron OAG this makes it
very easy to centre a guide star in the bullseye. The LED in the Meade reticle
eyepiece is attached to a cord which plugs into the control panel of the LX200. The
LX200 provides power to the LED but you can also use the LX200 handcontroller to adjust
its brightness and pulse it on and off. Using the LX200 handset I have found that I
can set the LED brightness much lower than the lowest level attainable on the Celestron
eyepiece. That allows you to see fainter guide stars. Also the pulse function
should allow for even fainter guide stars still to be used. The Meade eyepiece does
have a smaller FOV than the Celestron eyepiece as it has a shorter focal length but I have
not encountered any problems with this as I can move guide stars into the smaller FOV using
the adjustable prism in the Celestron OAG. The Meade 9mm Illuminated Reticle Eyepiece is ideal for use with the
Celestron Radial Off-Axis Guider. Unlike the Celestron reticle eyepiece which can be
be used to measure angular positions and distances as well as guide, the Meade reticle
eyepiece is designed only for guiding. It has cross hairs and a bullseye etched on
the reticle. However, unlike the Celestron eyepiece there are two screws on the
Meade eyepiece that allow you to adjust the position of the bulls eye in the
FOV.
When combined with capability of adjusting the prism on the Celestron OAG this makes it
very easy to centre a guide star in the bullseye. The LED in the Meade reticle
eyepiece is attached to a cord which plugs into the control panel of the LX200. The
LX200 provides power to the LED but you can also use the LX200 handcontroller to adjust
its brightness and pulse it on and off. Using the LX200 handset I have found that I
can set the LED brightness much lower than the lowest level attainable on the Celestron
eyepiece. That allows you to see fainter guide stars. Also the pulse function
should allow for even fainter guide stars still to be used. The Meade eyepiece does
have a smaller FOV than the Celestron eyepiece as it has a shorter focal length but I have
not encountered any problems with this as I can move guide stars into the smaller FOV using
the adjustable prism in the Celestron OAG.
The LX10 hand controller allows you to make RA corrections when guiding. It can either
stop the RA drive for Eastward correction or run the drive at 2x sidereal speed for
Westward correction. If you add the optional DEC motor to the LX10, the hand
controller can also be used make 2x corrections in DEC. The hand
controller and DEC motor are essential items for anyone considering using the LX10 for
astrophotography.
The hand controller can also be used to make small adjustments to the telescope
position for centering an object on a CCD chip or in a reticle eyepiece. I have found
it useful to be able to operate the hand controller while sat at my PC looking at the
images coming from the CCD camera as this allows me to position the an object correctly on
the CCD chip more easily. This would be easy if the PC is right next to the
telescope but mine is several feet away. To extend the handset cable so that it
would reach the PC, I purchased a length of 6 wire telephone cable with RJ11 connectors on
each end and a connector block to join it to the standard handset cable. It is
important to check that the cable and connector block are 'straight through'. That is, the
RJ11 socket on the connector block that you plug the handset into must have each pin
directly connected to the same pin on the LX10 drive base. Some cables or connector
blocks swap the wires over so that, for example, the left hand pin on one side of the
connector block is connected to the middle pin on the other side. If you do not
observe this rule the hand controller will not operate correctly, or worse, your equipment
may be damaged.
|