|
I can't speak too highly of the Kendrick dew
prevention/removal system. Dew build up on the corrector plate used to be a real
problem until I got this system. I have not had any dew problems since. The
system consists of a controller into which you plug up to four heaters. The
controller requires a 12V power supply and comes complete with a plug to attach it to a
car cigarette lighter. It has a number of different power settings. I have found
that just keeping it on low from the moment you take your scope out prevents any dew from
forming. Each heater is a thin strip of material which you wrap around the area you want
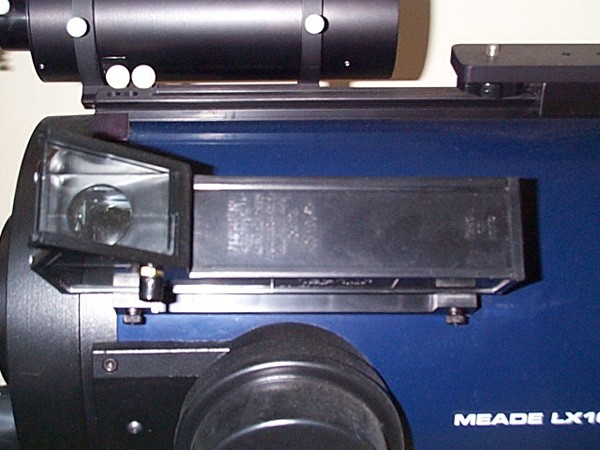
protected. I use an 8 inch corrector plate heater for the LX10,
a 10 inch heater for the LX200 and have a 4 inch heater for
use with the
Takahashi FS-60C. There are different size heaters available for
eyepieces and finder scopes.
-
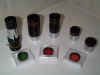
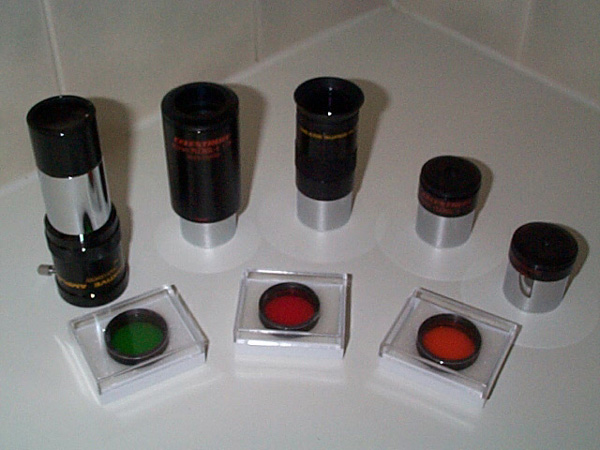
Celestron Illuminated Microguide Reticle Eyepiece
-
Meade Plössl
3000 series 25mm eyepiece
-
Meade Plössl
4000 series 25mm eyepiece
-
Celeston Plössl 6mm,
10mm and 40mm eyepieces
-
Orion solar filter for use with the ETX
-
Celestron Filters;
Light Blue #80A 30%T, Deep Yellow #12 74%T, Red #25 14%T, Light Green #56 53%T,
#96ND 25%T Density 0.6, Lunar Filter. These filters are very useful for lunar and
planetary observation. In my opinion the best all round colour filter is the Light
Blue #80A.
-
Lumicon Deep Sky Filter. Very
useful in light polluted areas for enhancing the contrast of faint nebulae.
-
True
Technology Clear, Red, Green, Blue and Infra Red filters for use in colour CCD imaging
-
SBIG Clear, Red, Green
and Blue filters for use in colour CCD imaging.
 The Meade LX200 can be used for
visual observation without an equatorial wedge. For visual observation you can
simply place the telescope directly on the field tripod and the telescope motors will
track the sky in alt-azimuth mode. However, if you try and take CCD images in this
mode you will only be able to take images with exposure lengths of less than 5 minutes
before star trails start to appear due to field rotation (in alt-azimuth mode the LX200
will keep the target object in the centre of the FOV but after a few minutes the other
stars in the FOV will appear to rotate around the central object). There are two
ways to get around this problem. The first is to buy a Meade Field Derotator. This rotates
the camera in the opposite direction to the field rotation to compensate for its
effects. The second is to buy an equatorial wedge and polar align the
telescope. Most people, including me, prefer the latter option because PEC is only
available when the LX200 is polar aligned on an equatorial wedge. Meade sell two
equatorial wedges, the standard wedge and the Superwedge. The standard wedge is
suitable for the 8 inch LX200 but the Superwedge is really required for the extra weight
of the 10 inch LX200. This is especially true if you plan to do CCD imaging with the
LX200 10 inch as the Superwedge will provide a much more stable platform for the
telescope. The Superwedge also has better polar alignment aids than the standard
wedge. Large wheels are provided that you can turn to make very fine and controlled
adjustments to the telescope in altitude and azimuth. The Meade LX200 can be used for
visual observation without an equatorial wedge. For visual observation you can
simply place the telescope directly on the field tripod and the telescope motors will
track the sky in alt-azimuth mode. However, if you try and take CCD images in this
mode you will only be able to take images with exposure lengths of less than 5 minutes
before star trails start to appear due to field rotation (in alt-azimuth mode the LX200
will keep the target object in the centre of the FOV but after a few minutes the other
stars in the FOV will appear to rotate around the central object). There are two
ways to get around this problem. The first is to buy a Meade Field Derotator. This rotates
the camera in the opposite direction to the field rotation to compensate for its
effects. The second is to buy an equatorial wedge and polar align the
telescope. Most people, including me, prefer the latter option because PEC is only
available when the LX200 is polar aligned on an equatorial wedge. Meade sell two
equatorial wedges, the standard wedge and the Superwedge. The standard wedge is
suitable for the 8 inch LX200 but the Superwedge is really required for the extra weight
of the 10 inch LX200. This is especially true if you plan to do CCD imaging with the
LX200 10 inch as the Superwedge will provide a much more stable platform for the
telescope. The Superwedge also has better polar alignment aids than the standard
wedge. Large wheels are provided that you can turn to make very fine and controlled
adjustments to the telescope in altitude and azimuth.
When you have a focal reducer, OAG, flip mirror finder, and CCD camera all attached to
the back of your scope it becomes a bit back end heavy! This system allows you to
rebalance your scope to avoid the risk of damaging your DEC gears or RA drive.
Instructions on how to set up the Losmandy system are here.
I use this counterbalance system on the LX10.
When you have a focal reducer, OAG, flip mirror finder, and CCD camera all attached to
the back of your scope it becomes a bit back end heavy! This system allows you to
rebalance your scope to avoid the risk of damaging your DEC/RA gears and motors. I
use this counterbalance system on the LX200.
This Scope Stuff counterbalance
system is similar in function to the Losmandy system, but it fits the
RCX400 tube and is much better value for money! I use four 2lb
pancake weights attached to the mounting rail on two 5 inch screws to
counterbalance the CCD camera and Takahashi piggyback scope. Instructions on how to
counterbalance a scope with a 2-D counterbalance system are here
The RCX400 10 inch is 20lbs heavier than the LX200 10 inch. This
makes it quite an effort to haul it on and off the tripod and equatorial
mount for each observing session. So I invested in a set of JMI
wheely bars. The RCX400, tripod, and superwedge sit permanently
on the wheely bars. This allows the entire telescope system to be
effortlessly wheeled in and out of the garage for each observing session,
significantly reducing setup time. The bars are very strong and once
at the desired location metal stabilizers are lowered to level the scope
and provide a very stable mount. I thoroughly recommend them.
 This relatively cheap finder
makes it very easy to line the telescope up with stars and planets that you can see with
the unaided eye. No optics are used in the Telrad it simply projects a set of
concentric red circles on the night sky a bit like a fighter pilots head up display.
All you have to do is swing the telescope until your target is in the centre of the
innermost circle and it will be visible in the telescope's FOV. Using the Telread I can
easily place a target in the FOV of my f/6.3 LX10 or LX200 when using a 12mm eyepiece. This relatively cheap finder
makes it very easy to line the telescope up with stars and planets that you can see with
the unaided eye. No optics are used in the Telrad it simply projects a set of
concentric red circles on the night sky a bit like a fighter pilots head up display.
All you have to do is swing the telescope until your target is in the centre of the
innermost circle and it will be visible in the telescope's FOV. Using the Telread I can
easily place a target in the FOV of my f/6.3 LX10 or LX200 when using a 12mm eyepiece.
In my observatory I use a
Pier-Tec 2 as a permanent
pier for the Takahasi TOA-130 and EM200 mount. It is quite sturdy and
can be raised or lowered electrically using a hand controller. Raising
or lowering the pier does not affect the polar alignment of the scope.
My observatory has 6ft high walls and a flat roof so this pier allows me to
lower the scope when the roof is in place and then raise the height of the
scope to reach low altitude targets when the roof is removed. |
